Navigating a website should be as easy as a walk in the park. Whether you’re a WordPress beginner or a seasoned website owner, mastering menus can tremendously elevate your site’s user experience. This blog will guide you through creating and managing menus in WordPress, helping you build intuitive navigation that engages visitors.
As an Amazon Associate I earn from qualifying purchases and sometimes recommend products from other sellers at no extra cost you. For more details see my disclosure policy and privacy policy.
Why WordPress Menus Matter
Menus are the backbone of your website’s navigation. They provide a logical pathway for users to explore your content, ensuring they find what they need without hassle. Good menus enhance user experience and can significantly reduce your bounce rate.
Poorly designed menus, on the other hand, can confuse visitors and drive them away. Knowing how to create and manage menus effectively keeps visitors engaged and returning for more.
Creating Your First WordPress Menu
Creating a menu in WordPress is straightforward, even for beginners. Here’s a step-by-step guide to get you started:
Step 1: Access the Menu Settings
To begin, log in to your WordPress dashboard. Navigate to the ‘Appearance’ section in the sidebar and click on ‘Menus.’ This will open the menu editor, where you can create and manage your menus.
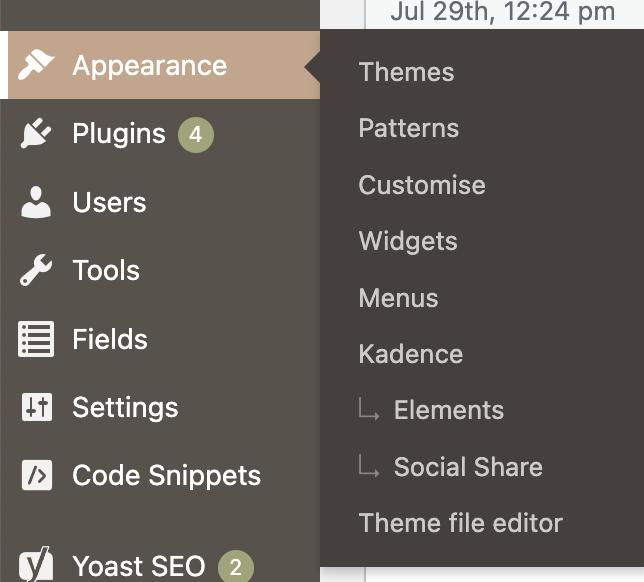
Step 2: Create a New Menu
Once in the menu editor, you’ll see an option to create a new menu. Click on ‘Create a New Menu,’ give it a name, and hit ‘Create Menu.’ You’ve now set up the foundation for your navigation structure.
Step 3: Add Pages, Posts, Categories, and Custom Links
With your new menu created, it’s time to add items. On the left side of the menu editor, you’ll find options to add pages, posts, categories, and custom links. Simply check the boxes next to the items you want to include and click ‘Add to Menu.’
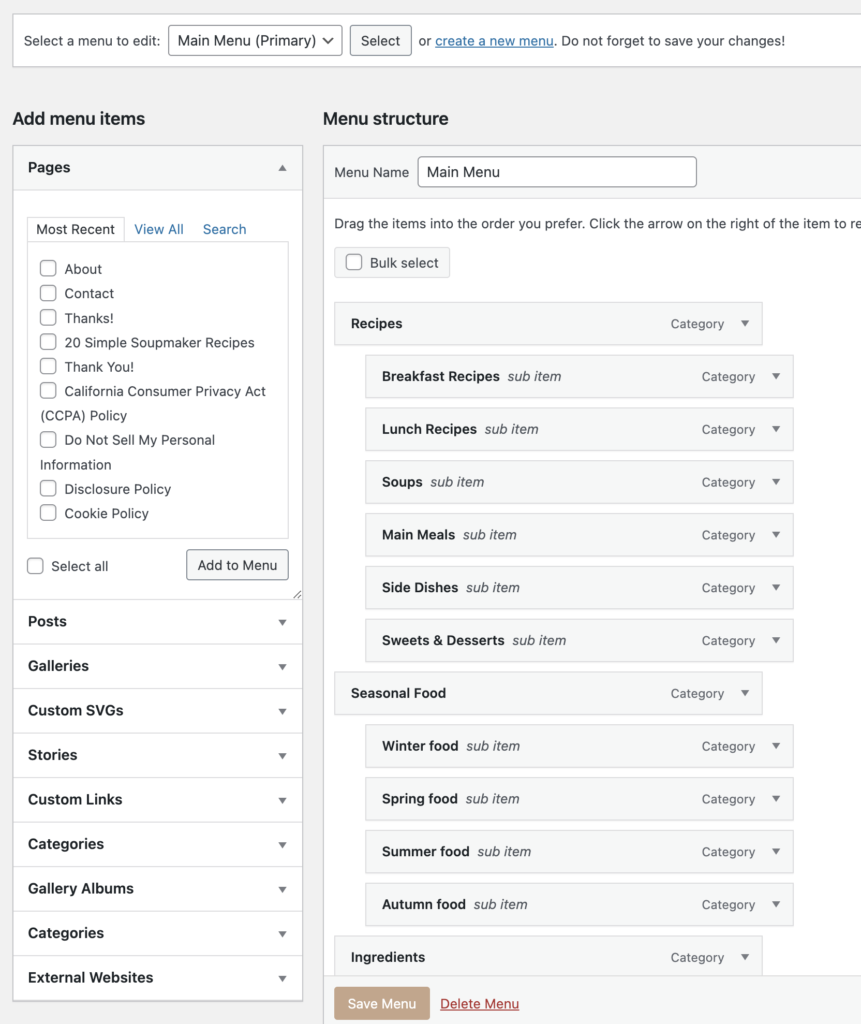
Managing Your Menus Efficiently
Managing your menus is just as important as creating them. Here’s how you can edit, delete, and rearrange menu items to suit your needs:
Editing Menu Items
To edit a menu item, click the dropdown arrow next to it. You can change the navigation label, add a title attribute, or even set it to open in a new tab. This customization helps in tailoring each item to fit your website’s needs.
Deleting Menu Items
If you need to remove a menu item, simply click the dropdown arrow next to it and select ‘Remove.’ This will delete the item from your menu but won’t affect the original page or post.
Rearranging Menu Items
Rearranging items in your menu is as simple as drag-and-drop. Click and hold on a menu item, then drag it to its new position. This feature allows you to organize your menu in a way that makes the most sense for your visitors.
Customizing Your Menus for a Polished Look
Customization can give your menus a polished, professional look. WordPress offers a range of settings to enhance your menu visually and functionally.
Adding Descriptions
Under each menu item, you can add descriptions. These appear as tooltips when users hover over the menu item, providing additional context.
Customizing Link Text
Changing the link text allows you to use more user-friendly language. For instance, instead of ‘About Us,’ you might prefer just ‘About.’ Customizing the link text makes navigation more intuitive.
Creating Drop-Down Menus
Drop-down menus help organize content into subcategories. To create one, simply drag a menu item slightly to the right, underneath another item. This creates a nested menu, perfect for complex websites with lots of content.

Understanding Menu Locations
Different WordPress themes offer various menu locations. Knowing where you can place your menus is crucial for optimal navigation.
Primary Menu
The primary menu is usually located at the top of your website. It’s the main navigation point for visitors and should include links to your most important pages.
Secondary Menu
Some themes offer secondary menus, often placed above the header or in the footer. These are great for less critical links, such as privacy policies or contact information.
Custom Menu Locations
Certain themes allow custom menu locations. These can be used for specialized navigational needs, like a sidebar menu for blog categories.
Best Practices for Menu Design
Creating user-friendly and intuitive menus involves more than just adding links. Here are some best practices to keep in mind:
Keep It Simple
A cluttered menu can overwhelm users. Stick to essential links and avoid adding too many items. Simplicity makes navigation straightforward and helps visitors find what they’re looking for quickly.
Use Clear Labels
Menu labels should be concise and clear. Avoid jargon or overly complex language. Visitors should understand what to expect when they click a link.
Prioritize Important Links
Place the most important links first. Items like ‘Home,’ ‘About,’ and ‘Contact’ should be easily accessible. This prioritization helps guide users through your website efficiently.
Conclusion
Mastering WordPress menus is vital for creating a seamless user experience. From creating your first menu to managing and customizing it, each step plays a crucial role in how visitors interact with your site. By understanding different menu locations and following best practices for design, you can build a navigation structure that keeps your audience engaged and coming back for more.